SQL Developer is a
graphical user interface (GUI) tool that Oracle Corporation supplies to query
databases, browse objects, execute reports, and run scripts. It supports
Windows, Linux, and Mac OSX. SQL Developer is a non-licensed (free) product.
Besides Oracle database, it can be used to connect and access third-party
(non-Oracle) databases, such as MySQL, Microsoft SQL Server, Sybase Adaptive
Server, Microsoft Access, and IBM DB2. Note that SQL Developer doesn't need any
installer so it also does not create any registry entries. Similarly, deleting the
SQL Developer directory removes it from your system and you do not have to run
any uninstaller for it.
1.
You can download it from the
following URL.
2.
Click the download link
defined next to the prompt: SQL Developer requires JDK 7 or above.
3.
Save and extract the zip file to a
directory of your choice..
4. Double
click sqldeveloper.exe file from the
extracted folder to start SQL Developer.
NOTE
One
of the first tasks that you may be prompted to do when you start SQL Developer
for the first time is to locate the Java Development Kit (JDK). SQL Developer
requires JDK 7 or above. If you selected the option to download SQL Developer
with the JDK, then java.exe will be included in the jdk sub-folder where you
extracted the zip file. If you couldn't locate the jdk sub-folder then you have
to download and run the jdk software (jdk-7u71-windows-i586.exe) from: http://www.oracle.com/technetwork/java/javase/downloads/jdk7-downloads-1880260.html
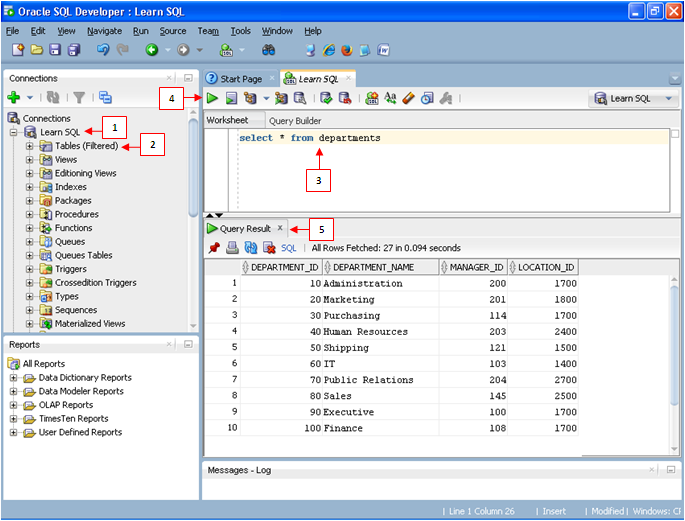
SQL Developer Interface
The above figure
illustrates the interface of SQL Developer, marked with some important sections
of this useful software that you’ll use in this book.
1.
Learn SQL: The connection
pane displays all connections you’ve created to connect to different databases.
In the next section you’ll create a connection named Learn SQL to connect to
the Oracle XE database, that you just installed.
2.
Tables: As
a beginner you’ll interact with database tables in this book to learn SQL. Once
you connect to your database, you can expand this node to browse all the tables
in the database. You can even see structures of tables and the data stored in
each table through this node.
3.
Worksheet: This is the pane
which you’ll use throughout the exercises presented in this book. Here you’ll
enter SQL statements to interact with your database.
4.
Run Statement: You click this button to execute
your SQL statements.
5. Query
Result: The result of the executed SQL
statement that you enter in the Worksheet will appear in this section.


No comments:
Post a Comment